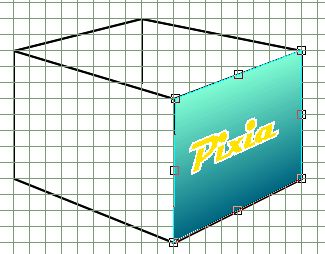
![]() A 3D box
A 3D box

Pixia in space ! As you'll see, the exercice is quiet simple. You'll just have to paste selections using free transformations.
 |
- Open a new canvas. - make the visible side of the box : here, I filled a square with a green gradation and past the text two times (a yellow layer and under another white one stretched with the filter ["Outline" / "Stretch"] ) For more details : text's tutorial. - When it's done, select it with a rectangular selection
and copy it. |
|
|
- Open a new canvas. - Display the grid
["View" / "Grid"] |
 |
- Draw the box
with the layout's tools : (About the tool "Broken line " : to end the selection, just right-click.) - This drawing just serve to give you some marks for the rest of the work. It will be clear at the end... |
 |
- Paste - The picture appears on your canvas. Place it approximately where you wanna put it. - Right-clic on it and select "Free transform". |
 |
- Move each handle at the selection's corners toward the box' corners... - Right-clic on the selection and "Paste as new layer". - That's all...
- Proceed exactly the same way for the second visible side... ...Paste / Transform / paste as new layer... |
|
The final layers' panel :
Download
the file boite3d.pxa
This tutorial has been done with the french's
Pixia version by a "like a cow english speaker". So
some Pixia's terms are wrong and some sentences should be incomprehensible... |
1) Change the light on the visible
sides : 2) Make the inner sides : (About the "Polygon" : to end and close the selection, just right-click.) 3) The shadow : You can make a self-made shadow. You can draw it and blur it the way you want... There's no recipe... 4) More : |

